Customization example: Create Custom Dashboard Experience with Access to the Doc History Report
The following example demonstrates how the Dashboard's Security interface can be used to create a custom experience for your users. In this example, a Dashboard view will be created and assigned to a specific user; this user will then be given permission to view only one report - Document History.
- Create a new user. Select the Manage Application Users option, and add a new record.

The following information will be required:
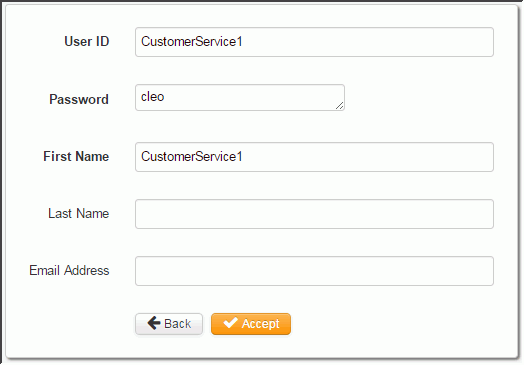
- User ID: This will be used to associate our new user with a role. This can be any combination of text and numerals. In this example, we will use "CustomerService1".
- Password: This will be the password the newly created user will sign in with. In this example, use "cleo".
- First Name: Used for additional identification purposes. In this example, simply duplicate the User ID.
Based on this example, the completed screen would appear like this.

Clicking Accept results in the newly created user record now displaying in Manage Application Users.
- Next, we create a role and then assign it to the new user (CustomerService1) with the
Assign User Roles option. Note: The Dashboard is based on the role; you assign users to different roles, and then assign reports, dashboards, and other resources to those roles.Create a role. From the Assign User Roles option, add a new record. The following information will be required:
- User ID: Since we've already created our user CustomerService1, this should be available for selection in the drop-down. Select it.
- Role: This is the identifier to the role. We'll need to know this as we
assign other resources. In this example, enter CustService in this field.
Clicking Accept now assigns the role of CustService to the user record CustomerService1, as shown here.

- Now let's create several menu options to be made available to our new CustService
role. Access to the Document History report is one option; however as with all Dashboard
users, we must also provide the ability to select a Data Source (think of this as the Cleo
system that the Dashboard is reporting from). So, from Manage Menu Options, we will
add two new records - a menu option to select a Data Source, the other option to select
the Document History report.
Adding the menu option for "Select Data Source"
Add a new record. The following information will be required:
- Major Group: Represents the highest level section(s) of the Dashboard screen. (The default Dashboard's Administrator and User views are examples of Major Groups). For this example, we designate Customer Service as our Major Group.
- Minor Group: Represents the options that display within a Major Group. (For example, the Dashboard, Data Transfer, EDI, and System Health are examples of Minor Groups). For this example, Call Logs will be used as a Minor Group for the custom view of CustomerService1.
- Menu Option ID: The key field identifies the resource (inquiry, report, menu)
to be made available. All Dashboard resources use code values, and these must be
manually entered here. For our example, the ID for selecting a Data Source is
I00290. Use the cross-reference
matrix to match a Dashboard resource with the correct ID. Note: When entering this ID, we must use a unique identifier to distinguish our custom menu-resource pairing resource from the default shipped menu-resource pairing. This can be accomplished by concatenating the ID with some user-defined text. For this example, we have added our user's name to the ID, resulting in I00290CustService.
- Menu Text: Represents the text that actually displays. Here we have the option to use whatever descriptive text we wish. Perhaps we prefer using the term “Cleo System” instead of the default “Data Source”, because that’s a more-friendly term for our company’s business users. For this example then, we enter Select Cleo System.
- URL: Identifies the path to the Cleo system and resource. Since we are using Clarify, and the Select Data Source inquiry, we enter CIS.I00290s. This string is always the product/version, a period, the function/feature code, and s.
Adding the menu option for "Document History report"
We could repeat the same exact steps as above to create our next menu option. Instead, we will use the Copy Record button to create a new record (based on the one just created), and
make only a few necessary edits.
to create a new record (based on the one just created), and
make only a few necessary edits.- The Major and Minor Groups stay the same.
- Menu Option ID: For our example, the ID for the Document History report is R00200, but to make this is a unique ID, we enter R00200Tracy.
- Menu Text: For this example, enter Document History Report.
- URL: Enter CIS.R200
Clicking Accept now displays both menu options, as shown here.

- The Assign Menu Options to Roles option is used to assign a resource (an inquiry,
report, or menu) to a role. This step will be performed twice - once for each menu option
to be assigned to our new role. In our example, the two menu options created above
(I00290CustService and R00200CustService) will be assigned to our new role
(CustServ).
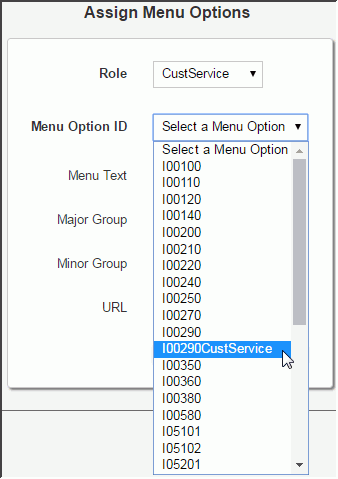
- Add a new record, and select CustService from the Role drop-down options.
- Select the unique ID from the Menu Option ID drop-down menu.Note: Make sure to select the unique IDs created in the step above.

Repeat this step to assign the Document History menu option.
- The final step defines security for the newly created role and its dependent resources.
This takes place from the Manage Application Security option, and the steps
described here must take place for each resource.
Add a new record for both resources in this example (Select Data Source, Document History Report), and define the following.
- Role: This identifies the role. Select CustService for our example.
- Application Type: This identifies an internal resource identifier - either Report (R), Inquiry (I), or Maintainer (M). In our examples, we use reports and inquires.
- Application Number: This identifies the actual resource ID. In our examples,
these IDs are 290 for the ability to select the Data Source, and 200 for the Document
History report. Note that the leading zeros are not required. Note: Both Application Type and Number can be found using the cross-reference matrix.
Dependent resources must also be assigned
For this example, the Document History report requires several other dependent resources in order to be complete. These are listed here (including the two already defined):
- R200 (Document History - Main Report)
- I290 (Select Data Source)
- I530 (Document History Search Code Drop-down)
- I100 (Connections report)
- I110 (Group report)
- I140 (Message report)
- I450 (Message Audit report)
- I900 (Raw EDI Data)
- I00110 (Group report)
Each resource must be configured in the Manage Application Security option.
While the above resources are specific to the Document History report, be aware that many other reports are dependent upon each other; for example, many reports include the Message Audit Report and ability to view Raw EDI. If a report drills up or down to another report, then that dependent report resource needs to be configured as well.
Looking at the example of the Document History report below, note that each of the identified sections of the report are in fact, the dependent resources we configured in this example.
The configuration steps are now complete. We can test the custom dashboard view.
Test the Result
- Sign off of the Dashboard.
- Sign on using the username/password created in this example: CustomerService1/cleo
- Select the data source.
- The Dashboard view should appear with the newly configured UI.
Summary of Steps
- Added a user from the Manage Application User option.
- Created a role and assigned it to the user using the Assign User Roles option.
- Created different menu and viewing options and assigned resources using Manage Menu Options.
- Assigned the different menu and viewing options to the role using the Assign Menu Options to Roles option.
- Assigned all required resources to the role using the Manage Application Security option.